Friday, February 27, 2015

Tongs are possibly the greatest kitchen gadget ever!

Image from: Bed Bath and Beyond's website: 
http://www.bedbathandbeyond.com/store/product/oxo-good-grips-reg-12-inch-tongs-with-nylon-heads/1013047766

Okay, extreme exaggeration aside, I really love my tongs. So much so that I am devoting my first post about kitchen equipment to talking about why they are awesome! If you are like me, there are times while cooking that you just wish you could reach in and do the next step of the recipe with your fingers. Maybe you're trying to flip a bunch of chicken tenders. Maybe you just can't get whatever you're making onto the spatula. The bottom line is: resist the urge to reach in to the pan! Instead, reach for your tongs!


Some uses for tongs:


http://tinyurl.com/lnvheqz
  • The usual:
    • Flipping meat
    • Tossing a salad with dressing
    • Making a stir fry
    • Putting something into a hot pan (especially if there's hot oil or grease in said pan...you don't want to just drop your food in and make a splash!)
    • Serving food--see the spaghetti serving suggestion in the video below!
    • Grabbing hot food from a hard to reach place
  • The "less usual:"
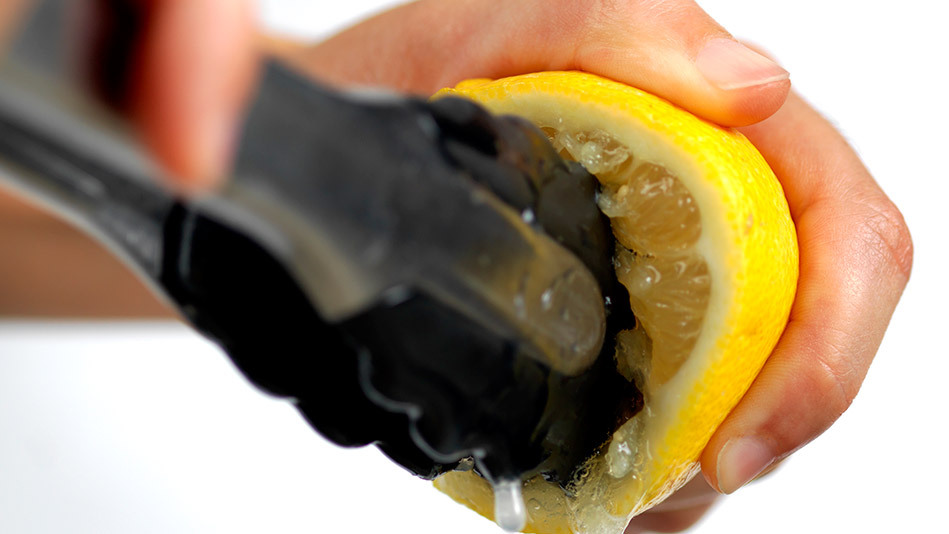
    • Use tongs to juice citrus! You can do this two ways:
      • Use the tongs as leverage to squeeze the juice.(left, top)
      • http://tinyurl.com/lsbw8hy
      • Pinch the tongs shut, and use like a citrus reamer (left, bottom)
    • When slicing cooked food, use tongs to get a firm grip on the meat without burning your fingers.
    • When I cook the bagged minute rice, I use tongs to make sure I've squeezed out all the extra water from the rice before I open it
    • You can use tongs as a bottle opener (watch the video to see how!)
  • The uses I've never needed:
    • I am very tall (6 feet in bare feet) so I've never been faced with this, but when researching unusual uses for tongs, I found that some people use tongs to help reach things off the top shelves of their kitchen cabinets!
    • There are special tongs made of wood specifically for getting toast out of a toaster.
This video from the Food Network is a bit silly at times, but it illustrates some great uses for tongs: 


If you have another use for tongs in your kitchen, I'd love to hear it! Leave a comment below :)

Things to consider when buying tongs:

  • If you use nonstick cookware, you should purchase tongs with nylon or silicone tips so you don't scratch the coating of your pans. My tongs are the ones from the top of the page and they have nylon heads (the link is to the picture source on the Bed Bath and Beyond website--at the time of writing they were about $13). I love them!
  • Tongs can either lock (like the ones I have...see the little loop?) or not (see the blue tongs used to juice lemons). I like the locking tongs. They are SO much easier to store!
    • Sometimes I use my tongs in the "locked" position, because they are a little open, enough to grab smaller items, and you can squeeze them closed. It seems like I can be more delicate with smaller things when the tongs are "locked."
  • Stainless steel tongs are long lasting and very utilitarian.

Sources:

http://www.americastestkitchenfeed.com/curious-shortcuts/2013/03/4-totally-terrific-tricks-with-tongs/

Tuesday, February 24, 2015

Pan Fried Chicken Tenders

For the first year of our marriage, I really only knew of one way to cook chicken. As long as there were no raw parts, I felt successful. See, I'm the kind of girl who loads her plate with side dishes at holiday meals--no pesky protein to get in the way of my mashed potato-ey goodness. So, chicken has generally always seemed like a safe (but bland) accompaniment to whatever else was on the plate.

My loving husband never once complained about my poultry preparation, but I eventually got tired of the-less than inspired-constancy. I even went through a phase where I would have been happy to never see another pack of chicken in my refrigerator. Common sense (and a sale on chicken breasts) won out. I read up on recipes around the internet, and cobbled together a method to make homemade chicken tenders with minimal effort and with items I almost always have on hand.

A few notes on the recipe: 
* The first few times I made this, I pounded the chicken before cutting because I could do that before taking the chicken from its food saver bag which meant less clean up. I find that that pounding the chicken tenders after cutting leads to more uniform tenders, and the resulting tenders are flatter meaning they crisp up better when you pan fry them. 
* You can buy the chicken tenders pre-cut. It costs a little more per pound of chicken, so I usually pass in favor of just cutting it myself. If there's a sale and you get the pre-cut tenders,  still pound them out. It's an extra step, but so worth it.
* I reference "Seasoning blend of your choice" in the recipe--I use a spice blend I'll be talking about next month. You can choose to add spices like cayenne for a kick, or stick to salt and pepper for a milder flavor
* I tried freezing the tenders once they were breaded and cooking them up later. They were still good, but the breading was not as crisp and it got a lot darker (because I was cooking the tenders longer). 

Ingredients:

1/4 cup all purpose flour                      1/2 cup panko bread crumbs
1 egg                                                    2-4 tablespoons of butter
2 chicken breasts                                 1 tablespoon seasoning blend of your choice

To prepare:

1. Cut each chicken breast into 5-6 pieces (or just open your pre-cut tenders). Cover with plastic wrap and pound with a meat mallet or a rolling pin until uniformly thin. Sprinkle with salt and pepper.

2. Set up your breading station in three shallow bowls. In bowl one, mix the flour with the seasoning blend (or just salt and pepper). In bowl two beat the egg with a little water (about 1-2 teaspoons). In bowl three pour out the panko bread crumbs. I tend to eyeball the amounts of flour and panko based on the size of the chicken tenders you are starting out with.

3. Dust both sides of each tender in the flour, dip both sides in the egg wash, then roll in the panko. This can get messy! I just use the panko bowl as the resting place for the finished tenders, and push the panko to one side as you use up the bread crumbs.

4. For each batch, melt about 2 tablespoons of butter in a large skillet and fry the chicken for 3-4 minutes per side. I have been able to fit two smaller chicken breasts-worth of tenders into one batch, and barely been able to fit two huge chicken breasts-worth into two batches. Just make sure you wipe the super brown bits out after the first batch so you don't have burnt bits attaching themselves to your second batch of tenders.

5. Serve with any dipping sauces you desire! I eat this with sides of broccoli and macaroni, because it brings out my inner child.

Tuesday, February 17, 2015

Hello!


Allow me to spend a few minutes introducing myself before we begin this blogging journey together. My name is Chelsea. I am an elementary school teacher (fifth grade!) from North Carolina. I am recently married (two years this June) to a wonderful man named Aaron. We have a cat named Pete and a small apartment with almost no storage--except for in the kitchen. We'll get to that in a second. I love to read, I (occasionally) love to run, and I've started to learn to play soccer.

The other thing I love to do is cook. In the summers, when school is out, and on the weekends, I enjoy being more adventurous with my cooking. I've been known to go to the farmer's market for produce first, then search out (or make up) a recipe that incorporates my finds. During the school week, however, I like to stick to what I know is good, simple food. I also enjoy making clever use of the many wonderful kitchen tools we received as wedding gifts to streamline or re-invent a recipe's prep or cooking instructions.

In this blog, I plan to highlight the things that inspire me--from gadgets to spices to new uses for everyday items. I hope that the things that I write will help you find inspiration as well, whether for a new recipe for dinner or a new purchase for your own cupboard.

I'm looking forward to this!

~Chelsea